Monday, November 29, 2010

If you're the praying kind...

As a mom who knows where her children are....who knows that they are safe and warm and okay....I have to do what I can to get the faces of these three boys out to as many people as I can ~ because their mother isn't as fortunate tonight.

Photobucket

This hits close to home for me as these boys are missing from Morenci, MI ~ a town about 4 miles away from my own hometown. My mother taught at Morenci until her retirement. Searches are being conducted in and around both towns, including the areas surrounding the state park where I worked when I was in college.

They have been missing since Friday, when their father gave them to a "friend" he had an internet relationship with. She was to take them from the home so that their father could take his own life, and return them to their mother's home at a designated time. The father's attempt failed, and the woman never returned the boys. Police have not yet proven (or disproven) that the woman really exists and are uncertain if the father's story is true.

Click here for more information. This story is also being picked up by CNN and other national news outlets.

PLEASE....no matter where you are, look at the faces of these boys. Memorize them. Know their names. Keep your eyes open for them. If their father is being honest, they may be with a woman driving a silver van, and they really could be just about anywhere by now.

And, most importantly, I ask that you pray for them and for their family ~ for safety and comfort and courage and strength ~ and for their safe return home.

Photobucket

Monday, November 22, 2010

Ooh! Ooh! Pick me!

Jen @ Tatertots & Jello is giving away a Silhouette machine! Now....I'd LOVE to win that bad boy, but I realize the odds of that happening are pretty much slim to none. There are so many amazingly cool projects you can do with a Silhouette! Head over to TT&J to check out some of the things Jen has done with hers, and leave a comment to enter to win one for yourself!

I'd love to stay and chat/post more/catch up, but I can't at the moment and when I {do} tell you all about it you'll understand why. I promise. I hope everyone is doing well! Have a fantasticly wonderful Thanksgiving ~ and good luck to all of you crazy Black Friday shoppers!

Photobucket

Saturday, November 6, 2010

What Sleep Deprivation Will Get You...

I'm tired. The hubband is gone hunting for the weekend, and he has my guard dog with him. Not that Molly (dubbed "the brown mound of lay-around" by my brother) isn't a force to be reckoned with...when she's taken her arthritis medication. ;) I just feel safer with 92 lbs of yellow dog at the foot of my bed. Even if I do think he'd probably lick an ax murderer.

Anyway...It's late and I'm putting off sleep and I started playing around in photoshop. Oh, c'mon ~ you know you've been there. I was thinking about making a Christmas printable to share, and trying to choose my favorite Christmas song from which to steal some lyrics...and then I thought, "Well, I always did like Bing Crosby." No ~ I'm not going the "Little Drummer Boy" duet with David Bowie route....I'm going old school...


How many of you are having flashbacks to the pool scene from "Christmas Vacation" right now? Right!?!?!? :)

***Edited*** This printable is available for download! :) It's formatted to a 5x7. {Click Here} if you're interested! I should also mention that I've linked up to the Weekend Wrap-Up Party @ Tatertots & Jello!

I think I might be tired enough to sleep now. G'nite folks!


Photobucket

Thursday, November 4, 2010

One of Those Days

As moms, we all know that at some point there is going to come a day when everything just goes wrong. That was my day yesterday. I got up in the morning, got tiny person 1 to the bus stop, and spent the morning making my list/s of things that I wanted to get accomplished while tiny person 2 was at preschool. Then I went to the basement to get clothes out of the dryer only to find that the clothes in the dryer were...wet. Cold, and wet. I ran the dryer and started sorting the laundry into loads (am I the only person in the world who can do at least one full load of {pink} every week?), then I went back to check on the clothes in the dryer b/c I wasn't having a good feeling. Yep...still cold. AWESOME. I told the hubband there was a problem with the dryer (perks of having him work from home!) and he checked it out...and then called the repair dude.

I went on about my day, and as I was preparing to take tiny person 2 to preschool, I realized that tiny person 1 had left her homework folder at home. Oooops. So, I threw the folder in the car, took TP2 to preschool and went straight to TP1's school to drop off the folder....only to find that the secretary had been trying to reach me b/c TP1 was in the office....throwing up. Seriously - f.a.n.t.a.s.t.i.c. Of {course} I'm going to have a puking kid....when I Can't Do Laundry!

So now, I've got 2 kids at home all day, and I have to get the house picked up and clear the area around the dryer so that repair dude can do what he needs to do when he gets here....TOMORROW. Yep - I've got laundry ~ literally ~ hanging from the rafters in the basement. Anyone wanna trade? NO!?!?!? Oh, c'mon! ;)

On the bright side, when I have a {crap} day, I usually find that doing something I really want to do makes me feel better. At least a little. So I have a quick, easy and inexpensive project to share ~ just in time for Thanksgiving. Here's the finished product, displayed in the entryway of our home...

Photobucket

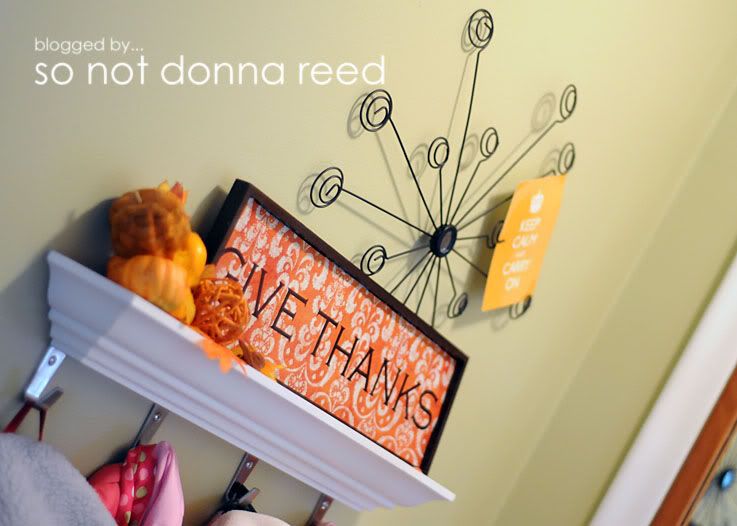
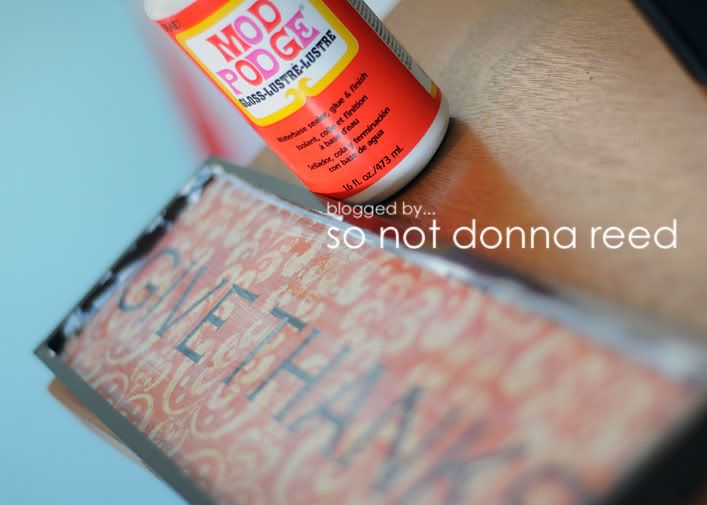
To start, I picked up an inexpensive wooden craft frame from Michael's. I brought it home, spray painted it brown, and measured the opening to determine the size of the print I'd need to fit inside it. Now, I've showed you this trick before, but I'm showing it again b/c 1) it's one of my favorites 2) when it comes to "oversized" prints, this really is a cheap and easy way to get what you want & 3) I want to remind everyone that you don't have to be limited just b/c you don't have a color printer at home. I used the measurements to make the art for the opening, then determined the closest {larger} size available from my Costco photo lab and moved the art onto a plain background in correct print size, so it looked like this...

Photobucket

Sometimes I darken the excess area, but I didn't bother with it this time. All I had to do was cut off the excess, do a little trimming to make sure it fit well, and bust out the mod podge to attach it to the frame.

Photobucket

So there you have it! A quick, easy, inexpensive little reminder to "Give Thanks" ~ which is just what I needed on a day when nothing seemed to be going right.

OK...I'm going to try to share this and see it it works! {Click Here} to download this printable ~ it's made to print as a 12x18. Enjoy! Go check out all the great ideas being shared at the Weekend Wrap-Up Party @ Tatertots & Jello!

Photobucket

Tuesday, November 2, 2010

Loving Fall!

There are so many things to love about Fall! And that month or so of fall between Halloween and {Thanksgiving} ~ when we can bring out all of our "pretty" fall stuff to replace our "spooky" fall stuff ~ is my absolute favorite. This year, I threw together a quick little something for our front porch.

For {$2} I grabbed a straw broom and a leaf vine from the dollar store, hit 'em with a few dots of hot glue & Voila!

Photobucket

It's a great little punch of color for the porch ~ one that only took, literally, 5 minutes to put together (including the time it took for the glue gun to warm up! for reals!) ~ and I love that it was so inexpensive.

Photobucket

In the next few days I'll be posting more Fall-type stuff! I have always loved {Thanksgiving} and, as much as I'm going to try to get my Christmas decorations up and the holiday shopping finished at the beginning of December, I refuse to skip Thanksgiving!

Sunday, October 17, 2010

Celebrating {six}

On Friday, the not quite as tiny person got even less tiny...she turned six! :) There was a great deal of excitement in our house ~ in fact the first thing I heard that morning (aside from my very rude alarm clock) was the voice of the tinier tiny person saying, "Sister! Sister! Happy birthday, sister!" Pardon me while I {melt} just a little.

The 6-year-old requested princesses on her cake, and my mom and I debated long and hard about how to accomplish that without having to pay someone else to do it. We scoured the toy department and the cake decorating aisles at the store and found {nada} that we felt would get the job done. And then, my mother had a moment of genius. Goodie bags...

Photobucket

The goodie bags we found came in a pack of 8 ~ we simply cut the picture of the princesses off of the front of one of the bags, frosted the whole cake, then placed the picture where we wanted it and piped some frosting around the edge. Obviously, it's not edible, but the birthday girl was {thrilled} with how it turned out, it was super easy and way inexpensive. Sneaky, right?

Wednesday, October 13, 2010

I Could've Cried...

And I would have if I had thought for even one second that crying would've been helpful. But when the pipe that runs underneath your bathtub decides that it's {d.o.n.e.} and can no longer resist the urge to grow a little hole....during bath time....and the water seeps through the drywall and the ceiling tiles in the finished part of the basement near the guest bed....yeah, crying doesn't do much good. This is part where I declare how glad I am that I married a man with handy-type skills ~ he went right to tearing down the tiles and ripping out the drywall. He located the problem, and starting taking stuff apart.

Photobucket

It sat like that over night, he got to work right away this morning and had the tub officially {fixed} before tiny person 1 got home from school. {Whew!} Thank goodness he's confident enough in his abilities to go ahead and at least {try} to do something that he's never done before rather than go straight to the yellow pages & call in a plumber. He totaled the receipts to right around $40. I don't even want to think about what the total would've been for someone to come out and do it for us.

Of course this is going to lead to other projects ~ installing an {access panel} in the ceiling (which should've been done by the people who finished the basement...) and probably tearing down {all} of the ceiling tiles and replacing them, or painting the drywall. I've been wanting to paint the walls down there for years, but was always told that we shouldn't bother to mess with it ~ I wonder if I'll get to paint them now!

So that's the excitement we've been dealing with here. Try not to be jealous of the glamour. ;)

Monday, October 11, 2010

What's for Lunch?

Ahhh, packing the school lunch. Trying to find options that are healthy, liked by the tiny people, not messy and can be consumed in 30 sec. flat....as it seems there's not a lot of time set aside for actual {eating} during lunch time. Apparently recess is so much more important.

In an attempt to switch things up a bit, I decided to try something different - sandwich rolly-things. So far it's a big hit, so I thought I'd share it with you lovely peoples.

Step 1 - Smoosh the living daylights out of a slice of bread. Now, you could use a rolling pin, but I find that using a flat-bottomed casserole dish does the job just fine. Smoosh....Press down hard....Flatten that sucker. {Enjoy} it. ;)

Photobucket

See? Pretty flat. You can press down again if you notice any spots where it might not be as flat as you'd like.

Photobucket

Step 2 - Cut off the crusts. For most of us, that's a step in the lunch-making process anyway, right?

Photobucket

Step 3 - My tiny people don't care for mustard or mayo, so I butter the bread before putting the lunchmeat (1 or 2 slices) on the bread. Cut up a cheese slice into smaller strips and set one on top of the lunch meat. If you have mustard/mayo/ketchup lovers, you can run a single line of it along the cheese so you don't go overboard, if you prefer to do that rather than slather it on the bread.

Photobucket

Step 4 - Roll it up...

Photobucket

It'll end up looking like this.

Photobucket

I can fit 4 of these in the not quite as tiny person's sandwich box, but I usually do 3 and a side of some sort of snacky-type food.

Photobucket

I usually round it out with a serving of fruit and something to drink, and call it good. The teachers at our school have implemented a policy that makes the kids bring home what they don't eat (unless it's horribly messy - like a partially eaten yogurt cup or something) and I can tell you ~ the not quite as tiny person eats these babies up. She even told me that she likes it when I make these b/c they're so much quicker to eat. {SCORE!}

Works great for PB&J, too - with PB over the whole slice and a line of jelly (or honey...that's a good one, too) placed about where I put the cheese on these.

So there you have it! Go smoosh some bread!

Sunday, September 26, 2010

On A Roll!

Three posts in three days!?!?!? It's MADNESS! ;)

When I first starting setting up my {craft room} I knew I'd need a place to put stuff up on the walls....a corkboard, magnet board...something. I bought 4 of those lovely little corkboard squares that come with the little adhesives that are supposed to hold them up on the wall. I say "supposed to" because I found out really quickly that those little adhesive thingies don't work for poo. So I consulted my stash of magazines and came across a dog-eared page in an old issue of DIY Ideas....

Photobucket

Those nifty metal {thingies} are actually gutter covers. Yep - the things that are meant to keep leaves and stuff out of your rain gutters. I paid around $10 for 5 of them. 2 cup hooks for each panel and a few quick taps with a hammer and {bam} ~ these babies were on the wall in about 5 minutes once I decided where I wanted them. Now, mine have the hinges on them, and I need to clip them off, but aside from that I'm pretty happy with the end result.

I picked up some clip-style magnets at Target ($6 for 6 magnets, so a little pricier than I wanted, but they're strong magnets so I'm happy) and then I went to town with a little {mod podge} and some scrapbook paper to personalize them and tie them in with the room.

Photobucket

Only having 6 magnets means that I can't over-clutter the area, which I think will help me weed out the old as I put up the new. Let's see how that works out. ;)

Saturday, September 25, 2010

Be True To Your School!

A while back I posted about Tulip Fabric Spray Paint. This stuff is {awesome} and I figured I should probably come back and do a proper post & tutorial. So here you go!

I used the fabric paint (this time) to make myself a shirt with the BGSU Falcon logo. (The old one...the one they used when I was a student....b/c I'm nostalgic like that). First, I found the logo online. The logo was {tiny}, so I had to save the photo to my computer, then open it up in Paint (you could use photoshop, too) and use the stretch/skew tool to enlarge it. Then I printed it out on regular paper.

Photobucket

Next step was cutting it out. Be careful when you do this b/c you're going to trace this shape...

Photobucket

Next I traced the shape onto freezer paper and cut it out. Now it gets a little tricky. I wanted the falcon head to be orange, so I had to be very careful when I cut this out so that I had all of the negative space entact. This is a simple design, so it wasn't too hard to do, but more intricate designs with a lot of cutouts can be difficult. Once I had the shape cut out, I placed the freezer paper onto the shirt where I wanted it, and ironed it on. I then cut out strips of freezer paper and ironed those on around the template so that the whole front of the shirt was covered and protected from any overspray. I also put a piece of cardboard inside the shirt so that the paint wouldn't bleed through to the back.

Photobucket

Then I picked up the trusty spraypaint....

Photobucket

and sprayed the living daylights out of it. ;)

Photobucket

You could go lighter for a distressed look, but I got a little trigger happy. And here I am modeling the end result.

Photobucket

My team didn't win ~ it wasn't even close ~ but I showed my BG Pride anyway. ;) GO FALCONS!

Friday, September 24, 2010

Say {Hello} To My Little Friend...

At risk of sounding like a high-strung infomercial announcer.... Don't you just hate the way your countertop or desk looks with a bunch of tangled up cords from your chargers? Cell phones, cameras, kids' handheld games, etc. ~ all of them have chargers and there is never a good place to {put} all that stuff. It's not pretty to look at, but it's all necessary. That's why I {love} this solution that I found in an issue of DIY Ideas Magazine.

First, meet my new buddy the hole saw.

Photobucket

Affordable & {super easy} to use, it's just an attachment that fits on your drill. The hubband handed this baby over to me without the usual 15-20 minute safety & use demonstration. It's really that easy to use.

What did I do with it? Simple. Remember that dresser that I painted a while back and moved into my craft room? Well, I designated the top drawer of the dresser to be a storage and re-charging drawer. So I drilled/sawed a hole into the back of the drawer, and cut another hole in the back of the dresser itself, lined up with the hole in the drawer. Then I put a surge protector/power strip into the drawer, fed the plug and wire through the hole, plugged it into the wall and {voila!} ~ a hidden charging center!

Photobucket

Before, I was charging my cell phone and camera batteries on the kitchen counter. It was a matter of time before something got fried by spilled coffee or juice, or didn't get fully charged because someone unplugged it so they could use the outlet for something else. And the tiny people had their Leapsters charging in their bedroom, which made it difficult to control how late they were staying up {playing} after lights out with the volume turned down. It's so nice to have a designated spot for all of my things to charge ~ where it's all safely tucked away.

I'm telling you, if you haven't picked up a DIY Ideas Magazine, you totally should. I'll be bringing you another project taken from an issue of the magazine sometime this weekend! I'm thinking a subscription needs to go on my Christmas list!

I'm linking up to Tatertots & Jello...b/c no one rocks like Jen rocks. For serious.

On a completely unrelated note, the ole' alma mater has a big football game tomorrow. BGSU takes on UofM at noon. It happens a couple of times a year in hockey (I hated going to UofM to watch the hubband play....those fans are MEAN, and when your boyfriend is the goalie it's really....REALLY unpleasant) but not so often in football. Just wanted to give a shout out to my FALCONS!

{ROLL ALONG!}

Thursday, September 9, 2010

Don't You {Forget} About Me!

I'm BACK!

The last month has been a little {crazy} with weekend trips out of town, going to the cottage Up North, and a full-fledged {vacation} to Florida with the ILs. Disney was awesome ~ the tiny people had a blast, and now we're back home and settling into the first week of school. (and.....exhale....)

With all that traveling, and bags that were going to be checked for our flight from Detroit to Orlando, I thought it would be a good idea to make some luggage tags for our suitcases. The hubband laughed at me ~ because really, he said, how would we miss the girls' bubblegum pink and bright green suitcases. Well, when we sat down on the plane and saw the {exact same suitcases} in one of the overhead bins, he started to understand a bit more.

So here's what I did. First I designed the tags in Photoshop. I chose to make our tags round, because I thought they would stand out more than the standard rectangle tag. I made 2 templates, with the first initial of the owner on one (the front) and the full name, address and phone number on the other (the back). Then I had each of them printed at Costco's lovely photo lab.

Photobucket

When I got them home, I cut the circles out and taped the 2 pieces together, back to back. I then used some store bought laminating sheets and laminated the tags. I found after doing a few of these that it was easier to use the hole punch first {before} laminating, and then punch another hole just through the plastic.

Photobucket

Then I tied them to our suitcases with bright, coordinating ribbon, just as an extra eye-catcher for the baggage claim area. (Don't worry, I didn't use hot pink for the hubband. ;) )

Photobucket

This worked really well. The bags were super easy to find and I didn't worry at all about someone grabbing ours by accident. One thing I would suggest if you decide to do this, though, is to take the tags someplace (Kinko's?) and have them {heat laminated} rather than using the sheets, and they have started to seperate ~ and honestly for the amount that I paid for those sheets, it's a little disappointing. I'm going to make tags like these, only smaller, for the tiny people's backpacks and for the not quite as tiny one's lunch box. Better safe than sorry, right?

LinkWithin

Related Posts Plugin for WordPress, Blogger...