Wednesday, March 31, 2010

Gotta Love a Twirly Skirt

Wondering what I've been up to lately? Well check {this} out! :)


I've gotta admit, I'm {proud} of myself for this one...because a) I'm not so much a sewer, b) I figured it out all on my own and c) I'm going to get one more spring/summer out of this puppy...if not more! WOOT!

This dress was a 3T, so definitely too small for either of my tiny people (5 1/2 and almost 4) ~ but I love it so much I just couldn't bring myself to give it away. So I decided to make it into a skirt. It was pretty easy (I say now...if you would've asked me immediately after my sewing machine needle broke & I couldn't get the doggone screw to turn to release it so I could put in a new one, you would've gotten a decidedly different answer). I cut around the bodice, giving myself as much fabric as I could while making sure the stay as straight as possible and paying attention to the existing arm holes. Then I folded that fabric over, making sure that I'd have enough room to run my elastic through the pocket I was creating, and sewed the new waistband. Then I fished the elastic through, sewed it together in the back and closed the pocket. {DONE.} Go me!

The tinier of the tiny people tried it on today and was thrilled with the twirliness. :) I was, too.

In other news...today, the Hubband hit Cabela's and came home with fishing equipment he may or may not actually need. And there, my dear bloggy friends, is my opening to buy paint and goof around with the bedroom furniture at the next possible opportunity. {insert evil grin}

Wednesday, March 24, 2010

Sooooo {EXCITED!}

You know those days when everything just falls {perfectly} into place?

Yeah, neither do I. ;)

But I had a day this week that came frighteningly close.
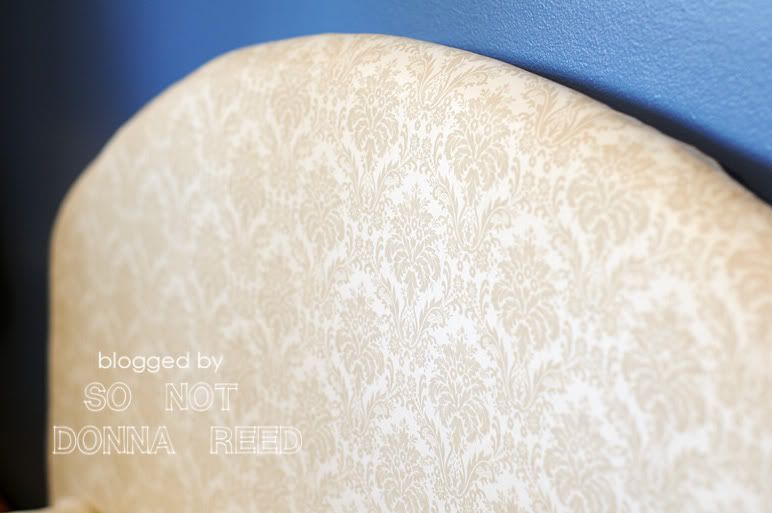

I found the {perfect} fabric to upholster the previously-mentioned {FUGLY} headboard ~ and I found it for 50% off at Kohl's. To top it off, I had a whopping $18.71 left on a gift card from Christmas, and with the sale I got 17cents back in change ~ so the fabric was, basically, free. {WOOT!}

In my perusal of blog-land, I stumbled upon another headboard upholstering project in which the woman used an old comforter instead of buying batting. {Brilliant!} (I cannot for the life of me remember where I saw this, so if you're reading and you know, PLEASE tell me so I can give proper credit.) I didn't have any old comforters lying around, so I did the next best thing ~ I hit the Salvation Army thrift store. Now, I'm not gonna lie, used bedding totally {skeeves me out} on several levels...so I should mention that (after being reminded to do so by my mom) I did the smell test before I purchased, and I then washed the comforter...twice...with copious amounts of {bleach} in each load...before I even considered doing anything else. I found the comforter for a whopping $8.

***disclaimer*** In case you're wondering the universe made sure I didn't get too excited about my close-to-perfect day. The following day, I opened up my car door...into my forehead. {OUCH} doesn't cover it. The bruise is HOT. But I digress...

It took me a couple of days to build up the 
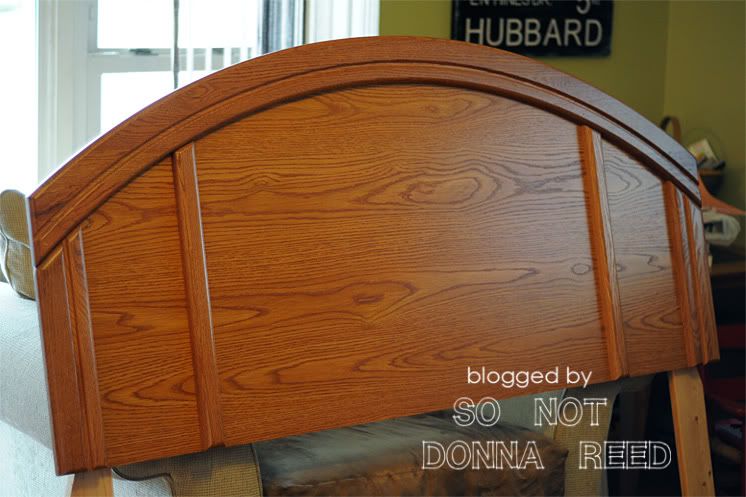
{courage} to actually start the project, because, honestly, if I did screw this up royally, we'd either be stuck using it anyway, or we'd go without a headboard. I should mention, too, that I don't mean anything {personal} by calling this headboard {FUGLY} ~ but it's clearly dated, and not in a vintage/antiquey/cool retro sort of way ~ rather in a "Whoa ~ that's totally from the 90s!" way.

Anyhoodle...yesterday, I took the {plunge}.

First, I removed the headboard from the bed and brought it out into the living room where I would have the needed floor space. I {cleaned} both sides of it, detached the legs and measured for new legs. Since I flipped the headboard around and used the flat side (what was the back) as the front, new legs had to be cut to work around the "decorative" trim that is on the side that was the front. That also required predrilling holes to attach the legs to the headboard, and to the bed frame...don't forget that part!


Next, I laid the comforter down on the floor and laid the headboard down on top of it. Once I determined that the comforter was large enough, I cut the sucker in half. I wanted the headboard to be {soft} and {cushy} so I wanted to use two layers of padding rather than one. I stapled the first section of comforter to the back of the headboard ~ pulling it taut & stapling 3 staples at the center of the top, then the bottom, then on each side, and then going back to add more staples in between. I did this with 2 layers of comforter....


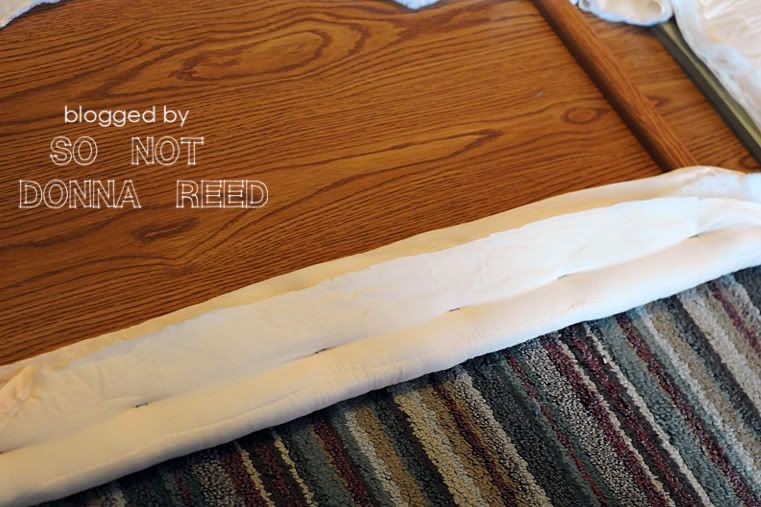
Now, because the sheet I chose is a thinner, microfiber material, and it's also light in color, I had to jump through a few more hoops to make sure that the {peachish} color of the comforter wasn't going to make an appearance. I had a couple of old, plain off-white sheets, so I used those (yes...two of them) to make sure that none of the color would show through. I stapled those to the back the same way I did the comforter.

Finally, I stood the headboard up, put the sheet over the headboard and lined up the pattern to make sure it was as straight as possible. I was doing this by myself, which made it a bit more complicated, but I did manage to pull and staple the top, bottom, and side tightly enough to then lay it down and finish it up without screwing up the pattern too badly. It's not {perfectly} straight, but it's as good as it was going to get, so I'm okay with that.


So, the {first} of many bedroom-related projects to come. I'm working on choosing a wall color now. I had considered a much lighter shade of blue, but now I'm thinking I might go with something closer in color to the print on the headboard. {Thoughts?} Please do share. The {FUGLY} dressers and nightstand don't have long to live, either...at least not in their current states. I've got a little trick up my sleeve for them, and I plan to paint them a dark brown.

In a brief and {fleeting} moment of excitement I realized that I would have enough fabric from the sheet set to do matching window treatments, but alas, the pattern was printed on the flat sheet {crooked} and I didn't realize it until after I'd cut...so now it's not lookin' like that's gonna happen. We'll see if I can muster up the {patience} for figuring that whole thing out.

Until then...I'm {happy} with what I've managed so far!

All linked up to Tatertots & Jello and Funky Junk Interiors! :)

Sunday, March 21, 2010

Peek-A-Boo!

Oh, c'mon ~ you knew I'd come back....{eventually}....right?

While I was busy neglecting you all, I began what is sure to be a long and lusty love affair with {Hobby Lobby}. Oh, lawd, help me. I had never been to HL before, although I had heard my mother speak of it's wonders, and had even sat in my van in the HL parking lot while she ran in for a quick item. Had I only known... I have been spoiled for quite some time with a seriously {rockin'} JoAnn ETC right up the street, but the store recently closed {SOB!} and I now have to hop on the expressway and drive a solid 30 min. to get to the nearest decent Jo's. HL is much closer ~ and while the fabric dept. is a bit lacking in comparison to what I had grown so accustomed to w/ my Jo's, it'll do!

I found {exactly} what I was looking for at HL. In the way of {burlap}. Yep, I'm on that bandwagon. ;) Seriously, though ~ I have been searching in vain for OVER A YEAR for the perfect fabric for window treatments for my kitchen. Granted, finding the perfect fabric to go with {orange} walls is undoubtedly never going to be easy ~ but this was getting a little ridiculous. Finally, Jen's many posts at TT&J about the wonders of burlap seeped into my brain & I decided to throw caution to the wind, bust out the glue gun and go for it. So, I went to HL, bought my burlap, found a great orange fabric to use as trim, and off I went...


I'm {thrilled} with the curtain over my kitchen sink and I think I'll be equally thrilled with the one over the other window...once the Hubband hangs it for me ;) ~ the shade on my back door needs a liiiiittle {tweaking} though, and I'm not entirely sure how to go about it. I wanted the blind to be long enough to cover the whole window, with the option of raising it so we can see out. I attached a loop to each of the upper back corners, and a ribbon about 1/3 of the way up the back on each side, with the intention of tying the ribbons through the loops to hold the shade in it's "up" position. And that worked, BUT, the center sagged SO badly that I couldn't stand it. I ended up tying the ribbons to the side of the actual curtain rod, which is much better, but the middle still sags. Being that I know a few things about sagging (if you have kids you know what I mean...) I feel bad for the poor thing and want to fix it. The hubband suggested a strip of velcro...which I suppose I could do although it feels just a bit like cheating.

In other news, the Hubband had a really big, really {stressful} career-related test this week. It was his second go-'round with this particular test (the first time didn't go so well!) and I am beyond happy and relieved to report that he {passed}! WHEW! He's in a pretty good mood because of it. A good enough mood to agree with me that our bedroom furniture is {FUGLY} and to let me attempt a re-do. WOO-HOO! I promise more on that to come...hopefully sometime relatively soon!

Friday, March 12, 2010

And I Didn't Even TRY...

Do you ever find that you're suddenly, for no apparent reason, drawn to certain color pallettes? The fabric I used for my camera strap cover & the apron I made for myself ~ my very first sewing projects ~ is a {bold, splashy, fun print} with green, orange, pink, yellow... Then I started crocheting, and after making a green-ish scarf for myself with yarn I had on hand, and pink scarves for the tiny people, I went out and bought myself some bright, multi-colored yarn. Yep ~ green, orange, pink, yellow...and white. Then I started thinking about a project I want to do (you'll find out soon enough) that I wanted to get some pretty papers for. So I grabbed some scrapbooking paper at Michael's. You guessed it ~ green, orange, pink, white ~ no yellow this time, but DANG. I hadn't even realized I was doing this! It hit me then that the sweater I picked up a couple weeks ago (for $3, thank you) is the same shade of pink. Will it never end!?!?! And THEN...


I saw that {Crystal} over at Little Bit Funky is making these super cute yarn wreaths. And that got me thinking. I had a wreath form. And I had the yarn. And, while I don't possess the skill, time, or actual fabric, I did have the paper. So I sat out the paper and the yarn, and couldn't believe how perfectly it all matched. Sickening, really. This is what I ended up with...


So, first I wrapped the whole wreath form with the yarn. I secured the end of the yarn to the back of the form with hot glue, then started wrapping it around the form. Then I took one of the tiny people's juice cups and traced circles on the back of the different papers, using both the bottom & the top of the cup so I have circles in 2 different sizes. I laid them out on the form to figure out the placement of the circles, but wasn't completely happy with the lack of dimension, sooo...I went a little green and hot glued some of the smaller circles onto discarded pop bottle lids and a few pieces of cork to create more depth. It's now hanging on my front door ~ which is {perfect} really, because it adds a punch of color, and it's not too thick to fit between our regular door and the storm door. It might not last more than one season, but that's OK...it was super inexpensive and {fun} to make ~ so I'm happy!

Speaking of that color pallette...how about the new header? ;)

Linking up to the amazing and wonderful Tatertots & Jello...

Wednesday, March 10, 2010

Wait...What is today!?!?!

I'm still trying to get used to "borrowing" the Hubband's laptop. He is very...ummm... {particular} about it's use. For example, it's okay if I turn the volume all the way down, but it is unacceptable for me to actually {mute} the volume, even though it requires no more time or energy to turn the volume on again that it would to turn it up. Interesting. I'm also finding that I lose access to the laptop around or before 11:00PM. Kinda sucks.

I do have a quick project to share, though! Don't try to hide it, you're {excited} ~ I know!

Those of you who are moms know that tiny people aren't so great with the whole grasping the passage of time thing. When the not quite as tiny person started preschool she would get so excited about school, but couldn't quite figure out the Tues/Thurs schedule. After hearing "I get to go to school today!" on random Saturdays, and trying to no avail to make her understand, I decided that she just might need a calendar of her own. So I made one.

It was {ridiculously} easy. I started with a full sized piece of posterboard (I have since made a smaller version for the tinier of the tiny people), but you could use whatever size works best for the space you have. I measured and drew out the grid for the 7 days of the week, then committed by writing the days of the week directly on the posterboard ~ no turning back now! I figured out how many activities I wanted to be able to place on any given day, then busted out the very sticky round velcro pieces and got to stickin'. {Captain Obvious} is going to point out that it's important that you use the same side (all fuzzy or all rough) on the whole calendar, and opposite side on all of the activity tabs. Like I said, seems obvious but I know I'd be the one to louse it up, so I'm sharing. ;)

You might notice that there's also a velcro piece above each day of the week. I had a tab that said "Today Is" that I moved each morning to the new day, but somehow...it disappeared! I can't begin to {imagine} how that could've happened.

Next go ahead and make the activity tabs. It's helpful to make a list of the tabs you want to make first. We have tabs for school, library, music (as in listening to it and dancing around the living room), watching a DVD, playing games/puzzles, bike ride, playing outside, going for a stroll, running errands, grocery shopping, doctor's appt, dentist appt, going on a trip, "special day", etc. Any kind of sports activities, piano lessons, whatever your kids are involved in, are a good thing to include - and when your kids start school, it's helpful to {everyone} if you put their "specials" (art, music, gym, etc) on the calendar so you're both aware and can be prepared ~ and you don't send your precious darling in a brand new outfit on art day ~ or a skirt on gym day. ;) I drew a picture of each activity, then wrote the word/s underneath it, so that even those who can't quite read yet can use and understand the calendar. If you wanted to, you could take pictures of each thing and use those instead of drawing. You could also laminate the tabs to help them last longer. I drew the activities, wrote the words, then cut them out to a managable size before sticking the velcro on the back.

I found this whole project to be super quick and easy, and it really does help the tiny people understand what's happening when. It does use up a lot of velcro, but it's totally worth it!

Thursday, March 4, 2010

Quickies... {tee~hee...}

First, a great big WOO-HOO and a {THANK YOU} to Jen at Tatertots and Jello! What a great surprise it was to see my subway art project featured on her blog! It made me feel totally {special} and cool. And yes, the Hubband did like it.

Second, a great big {apology} for falling off the face of the earth. It's the whole "no computer of my own" thing and I'm still trying to deal. Today, I attempted to load Photoshop CS2 onto the {prehistoric} desktop we keep chained up in the basement, and it didn't work. I'm trying to figure that out. That and the mystery of a totally distorted screen. Big fun. Hopefully the Hubband will have a chance to look it over this weekend so I can get back into the world of {blogginess} again. I've missed it soooo much.

Third, what an {awesome} surprise to get shout-outs in my comments from fellow BGSU FALCONS! I haven't been back to BG in years ~ the Hubband, otoh, gets back every summer for the hockey alumni excuse to get together & drink too much while re-living the glory days golf outing. There are a lot of great memories there for me and the Hubband. And since I know there are fellow Falcons out there, I'll try to get back sometime next week to post links letting you all know what you can do to try to help save the BGSU hockey program! ROLL ALONG!

I {have} been working on a few projects. I crocheted 2 more scarves ~ one for the tinier of the tiny people and a pretty one for myself ~ and I'm going to working this weekend on a bookend project & a wreath. I am so so so hoping to be able to share photos of finished projects soooooon. Cross your fingers for me, peoples.

LinkWithin

Related Posts Plugin for WordPress, Blogger...